All new keyboard for your C64 and C64C!
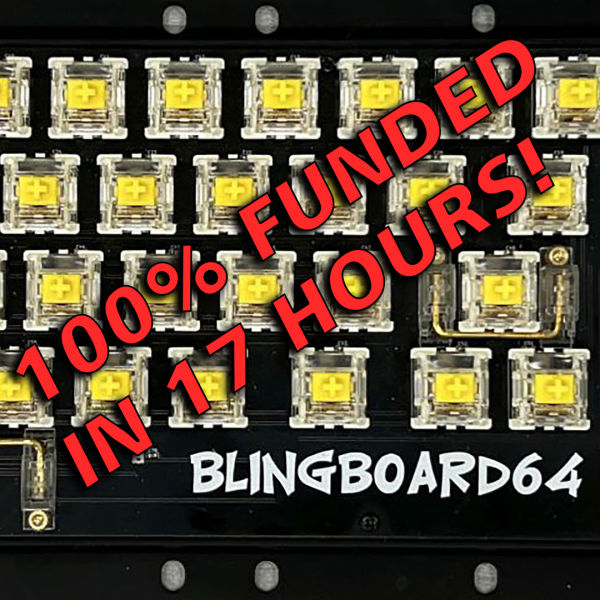
CAMPAIGN FUNDED
STRETCH GOALS ARE HERE!
The Campaign…
In December 2019 I launched a successful Indiegogo campaign to create new keycaps for your Commodore computer. Little did anyone know that the world would be turned upside-down due to a world-wide pandemic! Even though this was a difficult time, which included having to find a new manufacturer, numerous production delays, legal action against the factory, and the passing of my father, I pushed through and delivered to all of the backers. You can view the keycap campaign here: https://www.indiegogo.com/projects/keycaps-for-your-commodore-computer/
So, why this campaign? Well, I actually created the keycap campaign as a stepping stone for getting what I really wanted, which was an all new keyboard for my beloved Commodore 64! That time has finally come!
I own the molds for creating the keycaps produced in my last campaign. The mold sets consists of molds for the top and bottom of the main keycaps (56 keycaps), and another set of molds for the top and bottom of the large keycaps (CTRL, RESTORE, RETURN, SHIFTS, SPACE BAR, and FUNCTION KEYS). I had the original top molds deliberately created so that only new bottom molds would be necessary to change just the stem portion of the keycap. This means that the top molds that make up the original outer shape can be re-used for this campaign with no changes required. For this campaign I will need new bottom keycap molds and the top and bottom molds for the frame assembly that is used to hold the main circuit board. Fortunately, the frame assembly design is relatively simple, not requiring an EDM process or even high precision. This simplicity reduces the cost of the molds.
The Cost…
Creating tooling (molds) for plastic injection is still expensive, even off-shore. Production costs go down the higher the volume, but the reality is that this is a very small niche market. If the production quantities could be in the millions (like modern PC keyboards), then we could all enjoy dirt cheap keyboards. Unfortunately, that is not the case here. Having half of the tooling already done and ready to use is a huge cost savings for this campaign and why the total funding goal is lower for this campaign than the original keycap campaign, even though there are far more parts that make up the keyboard.
The Goal…
The Fixed Funding (all-or-nothing) goal of $30,000 is the break-even point for this campaign. This amount will pay for the tooling costs along with roughly 200 complete keyboard kits (with ‘Supa’ control boards), the Indiegogo fees, and credit card processing fees.
SHIPPING COST IS SET TO $1.00, BUT THE REMAINDER OF THE SHIPPING COST WILL BE DUE WHEN THE PRODUCT SHIPS! This is necessary because I learned with the keycap campaign that there is no way using Indiegogo to charge the correct amount of shipping for each country, especially when backing multiple of the same perk. I got stuck with literally thousands of dollars in extra shipping costs that I had to pay! Charging for shipping afterwards also allows you to change your mind and back multiple items by just adding another perk instead of having to go through a cancellation and refund process before re-backing the quantity that you really wanted. You’ll pay $1.00 shipping per perk now, but that will be subtracted from the total due prior to shipping. The shipping cost will be combined for all items you backed, and you will be contacted with information on how to pay that shipping amount, and also to choose your keycap colors. Indiegogo requires some amount of shipping fee in order to enable their back-end tracking system. So, every perk is set to $1.00 for shipping, but remember the actual shipping cost will be due separately prior to shipping your perk(s). This will be handled by PayPal, which can accept virtually every type of credit and debit card, or use funds from your PayPal balance.
The bottom line here though is that at least 200 keyboards must be backed to reach the funding goal. I think that is a pretty realistic goal considering that more than 3,000 sets of keycaps were backed in the last campaign.
The Items You Get…
All electronics (main circuit board and control boards) for this keyboard have fully assembled and tested SMT components. That means that you don’t need to solder any tiny surface mount parts – that is already done for you! There are two versions available – a kit version for the DIY type user who doesn’t mind some simple soldering and assembly, and a fully assembled version for those that just want to plug in the keyboard and use it. Here is an explanation of each option…
Kit Version
The kit version includes:
- 1 main circuit board.
- 2 mounting frames halves and 12 screws.
- 66 key switches.
- 1 control board with mounting hardware.
- 1 keyboard harness.
- 2 sets of stabilizers and stabilizer wires.
- 1 set of keycaps in your choice of colors.
This version requires that you place and solder the 66 key switches on to the main circuit board, plug in the control board and use the mounting hardware to permanently attach it to the main circuit board, attach the frame to the main circuit board using the provided screws, and placing the keycaps on the switches.
Assembled Version
The assembled version is plug-n-play, with keycaps in your choice of color! You can simply replace your existing keyboard with this one and it is ready to use with nothing else required.
Control Boards
There are two choices of control boards, either the BASIC control board or the ‘Supa’ control board. Please see the Technical Details section below for information about these boards. Please make sure to select the perk you really want!
Keycaps & Switches
You can chose your keycap colors. You can choose the same or a different color for the function keycaps set. So, either all 66 keys can be the same color, or the 62 main keycaps can be one color and the four function keycap set can be a different color.
Unless the stretch goal is met, the keyboard text will be the same as the C64C, with the printing only on the top of each keycap. You will choose your keycap color(s) when you are contacted for paying for the shipping cost. Optional extra sets of keycaps are available. Only those who back a keyboard will be allowed to back extra sets of keycaps!
The current campaign color options are shown below. This list will be updated when stretch goals are met. I realize that this is a very small list, but if the funding goal is reached it is likely that there will be a dozen stretch goal colors available, just like the previous keycap campaign. Initial keycap colors will be:
- Black w/white text
- Clear w/white text
- Translucent Black w/white text
- Translucent Blue w/white text
- Translucent Red w/white text
- Dark Gray w/white text
- Orange w/white text
I chose to use Gateron switches, specifically their Pro G 3.0 switch, which provides a smooth linear response with a 55g actuation force. This closely resembles the force of the original keyboard. Although these switches are premium and more costly, they are well worth it because all of the cheaper alternatives I tested had an unsatisfactory feel. Maintaining quality was important for this project.
The Timeline…
It takes approximately 45 days to create the new molds and make the first samples. I don’t expect any issues with the tooling since I already have molds for the top shape of the keycaps, and the frame mold is pretty simple. Of course I have shared the production files with many factories while getting quotes, and all of them have verified there should be no issues with producing these parts. I have also made production quality prototype keyboards using resin 3D printed parts, so I know the design of the parts fit perfectly. I will be shipping the final product from my location in the U.S. because I want to inspect the quality of every backer’s perks before being shipped!
The estimated time line is shown below. If there are changes required to the mold(s) or printing after the samples evaluation that could push the timeline out.
- Campaign Begins: April 29, 2024
- Campaign Ends: May 30th, 2024
- Funds released by Indiegogo: June 3rd, 2024
- Tooling and circuit boards ordered: June 4th, 2024
- Circuit boards finished: June 25, 2024
- Circuit boards received: July 1st, 2024
- Tooling finished: July 16th, 2024
- First plastic evaluation samples received: July 22nd, 2024
- Full plastic production begins: July 23rd, 2024
- First plastic batch received: August 5th, 2024
- Packaging & shipping to backers begins: August 6th, 2024
- Starting to appear In backers hands: August 8th, 2024
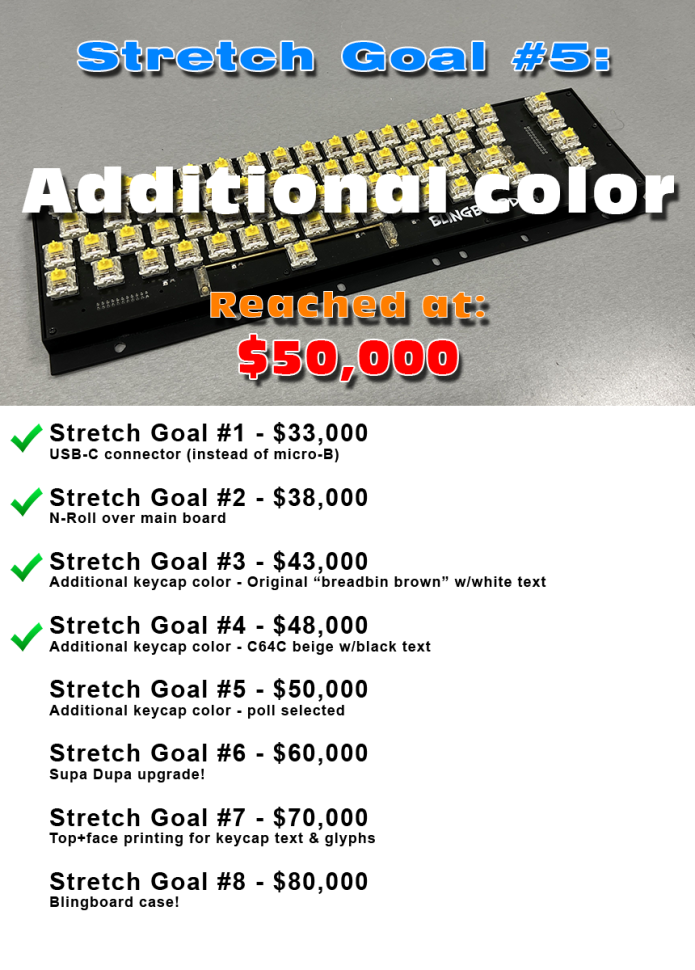
The Stretch Goals…
I have a list of desirable stretch goals, but I am open to anything that makes sense. If we get close to reaching the funding goal I will take a poll to decide what becomes an official stretch goal. I have come up with these possibilities:
- More keycap colors!
- Screw mount stabilizers instead of snap-in stabilizers?
- Metal inserts and machine screws instead of self tapping screws for frame mounting?
- Supa-dupa board?
- Stabilizer pads?
- N-roll over main circuit board?
The Risks & Challenges…
I certainly have what it takes to make this possible as I battled through Covid and the resulting manufacturing closures, finding new factories, dealing with production issues, etc. to deliver the keycap campaign launched in late 2019.
I have four different factories ready to do this right now, including a U.S. option that is more expensive, but a viable solution should it be absolutely necessary. Unless there is another world-wide pandemic I can always hop on a plane and sort out any issues face to face with the factory.
I have production quality working prototypes, so there is no question that this can be done! I brought one prototype to the 2023 VCF Mid-West retro-computing event for people to see and try.
I have the capability to store, handle, and ship thousands of package to customers.
I have a long time history in the Commodore community, producing many dozens of popular products.
I have insurance covering shipments and the facility that would be storing the keycaps (in case of fire), and every protection mechanism I can think of in place already.
The Technical Details…
In 2017, I began designing a new keyboard for the C64. Recognizing the limitations of FDM 3D printing, I opted to invest in a resin 3D printer to achieve the level of surface smoothness and precision required. My initial design replicated the shape of the original C64 base plate but incorporated square holes to securely hold Cherry MX switches in alignment. The plan was to insert the switches from the top, with a circuit board positioned below for soldering the electrical contacts.
However, early in the process, a significant challenge emerged. Once a switch is inserted and pressed flush with the plate, its mounting tabs lock it in place. This posed a problem for switch removal, as compressing the mounting tabs from the rear of the switch to release it, became impossible with a soldered circuit board in the way! As a result, any attempt at switch maintenance or customization, such as adjusting spring pressure or changing plunger colors, would require the labor-intensive process of desoldering all switch connections, removing the board, and then accessing the desired switch. It was clear that this design was impractical.
Original resin 3D printed prototype base plate
So, I decided on a different approach. There are “3 pin” and “5 pin” switch types available. A 3 pin switch has a large center guide pin and the two electrical contacts. The electrical contacts are light weight metal pins. These pins can bend easily and so without some type of additional support the switch can be rotated with little effort, including normal typing pressure being applied. A 5 pin switch is just like the 3 pin switch, but it also includes 2 additional guide pins that prevent the switch from being able to move. Using this type of switch allowed me to mount the switches on top of a circuit board, resulting in perfect switch alignment with no possibility of rotation. This was a great solution.
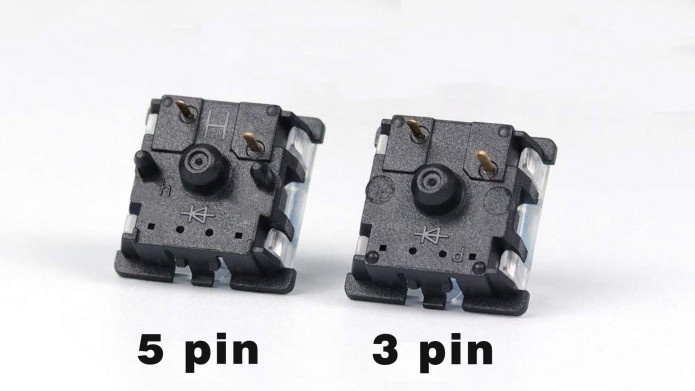
5 pin switch vs 3 pin switch
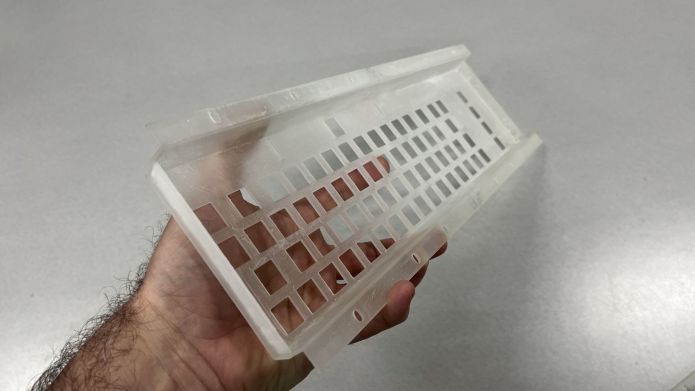
I made a frame assembly to hold the circuit board, ensuring the keycaps are positioned at the correct height, like the original keyboard. It took some trial and error, especially since I found that not all original base plates have the same hole spacing. But I managed to create a keyboard that fits perfectly in either a C64 “breadbin” or C64C computer.
One thing I did during the design process of the keyboard is center the large keycaps over the switch plunger. If you look at the original keyboard you will find that CTRL, RESTORE, SHIFT KEYS, and FUNCTIONS KEYS all have the plunger off to one side of the keycap. This results in some drag when pressing the keycap down on the side opposite of the plunger, and the keycap also tilts when pressed. Centering the keycap over the switch plunger fixes this issue. This means that these keycaps will actually fit on a standard PC keyboard, but they will NOT work with the Mechboard. The Mechboard uses adapters with the original keycaps so it relies on the keycaps being off center. Also, because adapters are used the keycap height would be much too low. So, please don’t expect the keycaps from this campaign to work on a Mechboard, because that is not the case.
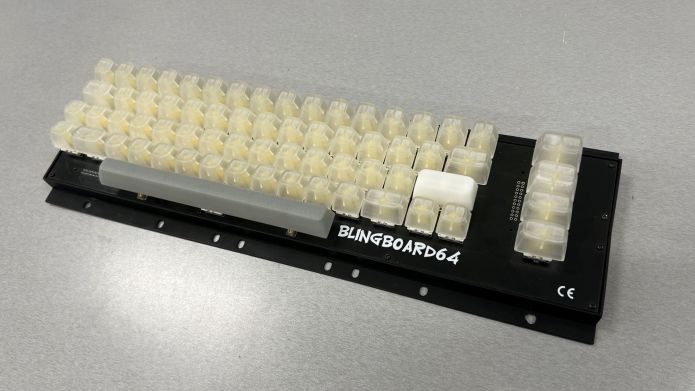
First completed prototype, seen here with resin printed keycaps
I knew the electronics would need to handle the soft SHIFT-LOCK, LEDs, and any other features that might be wanted. The first electronics I designed to control the keyboard functionality were on the main circuit board. Even before the pandemic I started noticing that I was having difficulty getting some components, and this led me to start thinking about what would happen if some CPU or other specialty part would be delayed or worse yet, discontinued. That scenario would require a complete redesign of the main board again. The main board is a large and expensive circuit board to produce. I opted to make the control electronics on a plug-in board instead of being integrated into the main circuit board. This made it easy to change just the control board should any parts be discontinued, or if additional features were needed. This configuration costs a bit more, but this decision makes this keyboard future proof. The main circuit board has 70 RGB LEDs that are individually addressable. This means that every LED can be a different color and brightness level. If the N-roll over stretch goal is met, the main circuit board would also get 64 diodes added to it so that it becomes a N-roll over type keyboard. This would eliminate the key “ghosting” that occurs when multiple keys are pressed at the same time.
The BASIC Control Board uses a small PIC microcontroller that can see only the SHIFT-LOCK and RESTORE key switches. All of the keyboard lines are passed through just like the original keyboard. By using the SHIFT-LOCK and RESTORE keys, you can make ways to program some simple keyboard features such as how the SHIFT-LOCK works, background LED colors or patterns, sleep time before the keyboard goes dark, etc. There is no way with the BASIC control board to monitor each individual key switch.
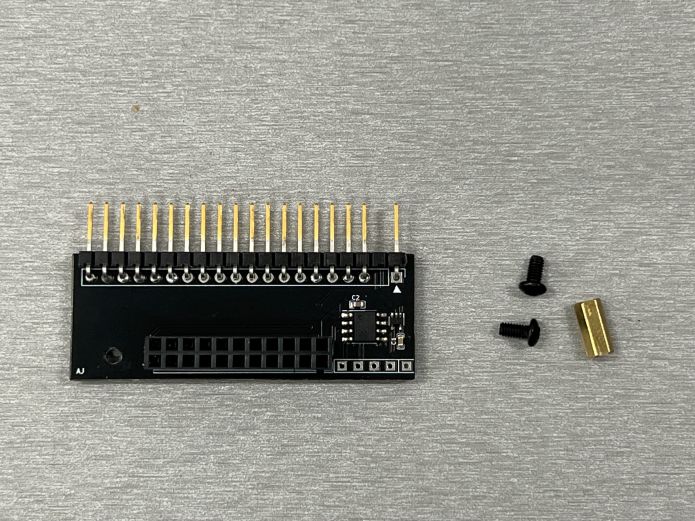
BASIC Control Board with mounting hardware
The Supa Control Board is much more advanced. It does the scanning of the key switches and uses a crosspoint switch to emulate key strokes. The LEDs can be individually controlled, there is onboard WiFi for firmware updates, and a micro-USB connector which allows emulating a standard USB keyboard that is compatible with PC, Mac, Linux, and other systems. There is also an expansion port that could be used for a variety of functions such as a MIDI controller interface. From the C64 side there is the ability to record and play macros, so anything from simple short cuts to full BASIC programs could be programmed and invoked by pressing a key combo. This is an expensive board to make because there are only 2 different manufacturers that make crosspoint switches that will work for this project, and only 1 of those offers an IC that operates on 3.3 volts, making it directly compatible with the CPU being used. There is no ability for the Supa board to communicate directly with the C64’s CPU. If the Supa-Dupa stretch goal is met, then that will change because that board will have the ability to communicate with the C64 via the dual CIA port bus that is used for the standard keyboard interface. That opens up a large number of possibilities including off-loading complex code to the board’s CPU.
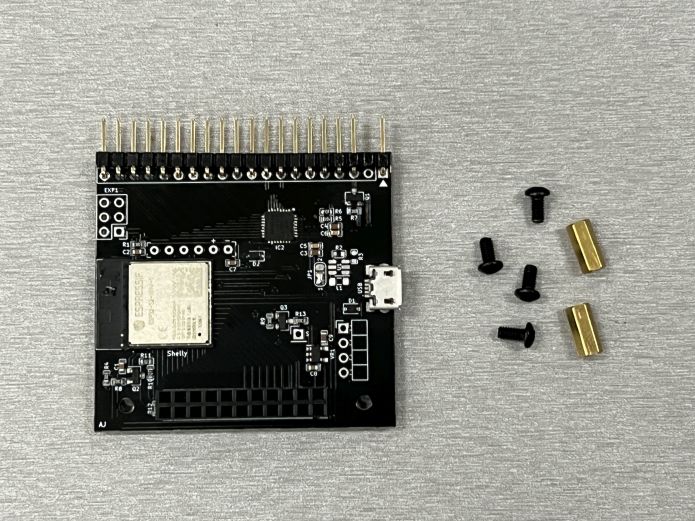
‘Supa’ Control Board with mounting hardware
Of course no keyboard is complete without keycaps! For this project I am re-using the existing molds to get the top (outer) shape of the keycap, and making new bottom molds that gives you the proper receptacle for the Cherry MX type switch stem. These keycaps will be top only printed, with the text and graphics just like a C64C keyboard. If the stretch goal is met to allow for both top and face printing (like my last keycap campaign) then the printing will be done that way. You can expect the same fantastic quality plastic that my last keycap campaign gave us, and serious focus on the printing to make it perfect.
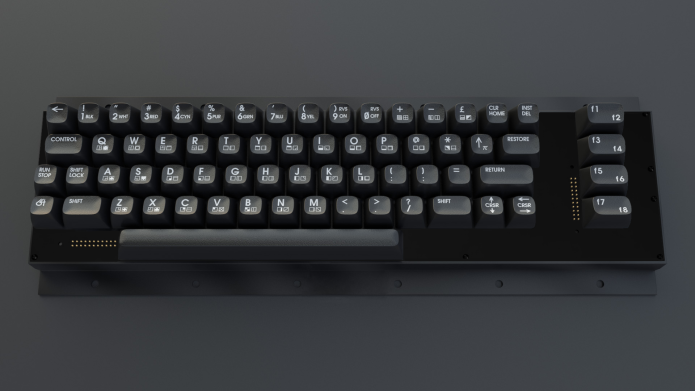
Rendering of keyboard with production keycaps
The Credits…
There have been many people providing assistance with this project. Some of these people also assisted in the keycap campaign. The list is long, but special thanks goes out to:
Dan Tootill for providing the AMAZING renderings, various 3D graphics, and keycap text for the original campaign! Some of that same data is being used for this campaign and the new keycaps that fit on the standard Cherry MX type switches.
Vince Valenti for creating the great keycap color picker! I will be using that again with this project.
My wife (the keycap sorter) for putting up with me and my hobby! 🙂
The Communication…
I think people realize by now that I don’t go and hide when things get tough. I made more than 170 updates to the keycap campaign and answered every question that came in, both through Indiegogo and via email. This campaign will be no different. You can contact me by asking a question here or by visiting:
Forum on CBMSTUFF.COM: https://www.cbmstuff.com/forum/
CBMSTUFF.COM Discord: https://discord.gg/rrqTTCTCYm
The Legal Disclaimer…
This campaign is in no way associated with POLABE HOLDING N.V. who is the current petitioner for the pending trademark “C= Commodore”. Use of the “Commodore” name and pictures of Commodore products falls under “nominative fair use”, per U.S. law. No trademark is being violated by this campaign. There were no design patents ever made for the Commodore C64 keyboard, and if there had been they would have long since expired. Design patents and copyrights for text fonts and glyphs are not allowed in the U.S. or any other country on the planet.
The contents of this campaign are copyright (C) 2024 By Jim Drew / CBMSTUFF.COM. You are welcome to use any of the above content for the sole purpose of promoting this campaign.
Thank you for viewing this campaign! I hope that you will support it! Please tell your friends about it!
For great retro-computing products please visit https://www.cbmstuff.com